Showing posts with label Small Projects. Show all posts

Friday, 3 July 2015

Off to Europe we go! (and some progress updates)

My friends, the time has come; me and my son are off to Turkey this evening!!! I am super excited and a little nervous too. You know that feeling; you think you forget something and keep searching for it in your mind even though you made checklists and ticked everything off the list! Yes, I have that feeling and cannot stop searching for that missing item. And probably won't stop until I arrive at my destination!
Before I leave, I want to show you some progress photos of the quilt I made for my son and a few bits and pieces I made to take with me as gifts. 
Let's start with the quilt. Here is where I am at at the moment.
My initial plan was to buy some nice flannel fabric from Turkey and start quilting it once I returned...uhmm..nope, I couldn't wait. I couldn't resist the itch. I bought some very cute flannel from Lincraft-normally I never buy fabric from Lincraft or Spotlight but this fabric was good quality-and just got on with it. I think I made a very good progress; given that I quilted that area only in two days. Then I had stop to prepare for our departure.
I chose to quilt it with this linear pattern as I thought it would compliment the stripes on the quilt (I have other plans for the stripy bits). It is so fun; goes very quickly and you can fill a large area in no time. I must admit that I am not very happy with my thread colour choice. It doesn't show clearly in the photo but it is variegated with some soft yellows, blues, greens and pinks. I thought they would pop on the grey background but instead , they blend in so well that they become almost invisible. The thread quality, however, is superb! It is Superior King Tut; nice and shiny, the weight is beautiful- I think it is NE 40 in Aurifil, and the most importantly it doesn't create lint balls in the bobbin case area, which is the only thing I don't like with Aurifil. 
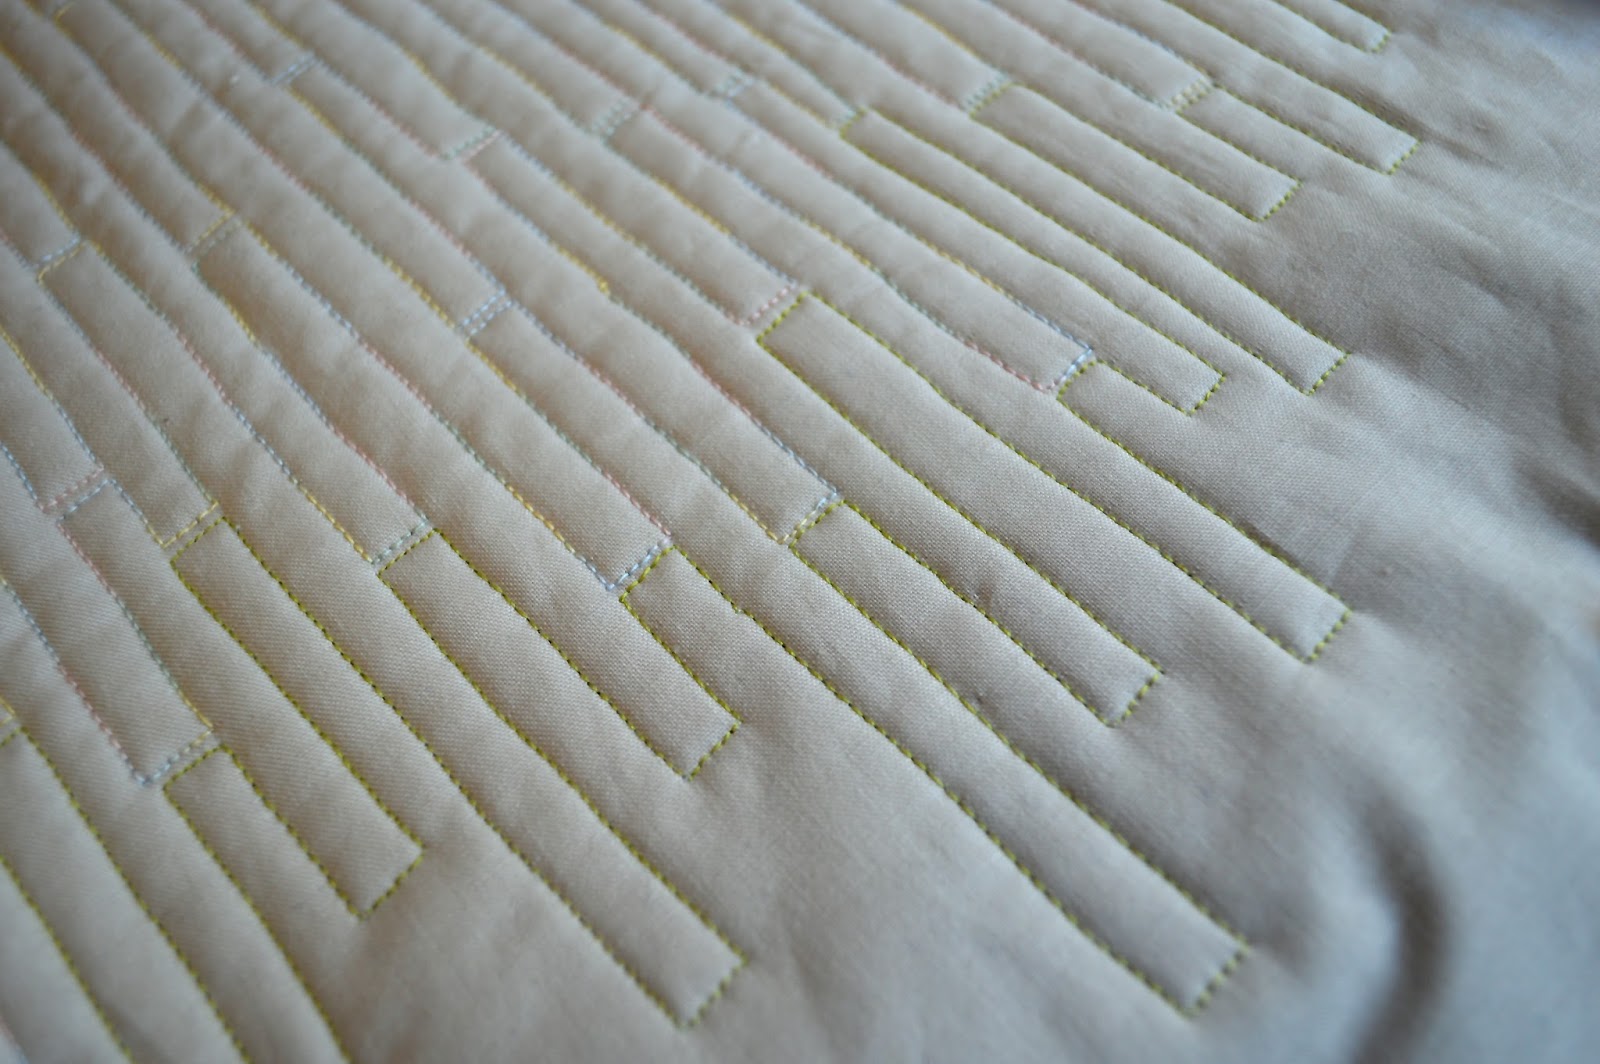
So, to add some colour for the sake of visibility-if it is so!-, I also quilted with a lovely green Aurifil I found in my stash. I will at least quilt a few rows in this colour and then go back to the variegated one.
Well, even though the thread colour didn't go as planned, I am so proud of myself. I never thought I would be able to manage such a large quilt on my domestic machine but proved that it was possible. I made a very good progress; I will be very happy to find it almost half quilted when I return. Also, I love the texture that the quilting creates!

I did some gift shopping for my family and friends as well. Over the six years, I had three trips to Turkey and took lots of gifts that reflected Australia. This being the case, I struggled to find different and unique things for a few family members; so I decided to make pouches for them at the very last moment!!
I used a thick interfacing for the green bottomed one and regretted it so much. It was almost impossible to turn the pouch inside out. Because of the struggle, the fabric wrinkled and ironing it didn't help much. So, for the red bottomed one, I just used cotton batting without interfacing and it was just perfect too. (I now notice that I forgot to topstitch around the zipper. I might still have time for it LOL.) The tutorial for these pouches and two other sizes can be found at Noodle-head

And the last thing to show you is one of my bee blocks which I totally forgot about until the other night! 
It was around 11pm when I started cutting the fabrics for this. Luckily, I had every colour I needed. I finished making the second one early this morning as soon as I woke up and they have been sent to its recipient. Phew!
Oh, one more thing. I was given a lovely charm pack by a quilty friend a while ago. I didn't have any plans for it until I decided to entertain myself in the plane with EPP hexagons!! I quickly ordered the templates, which arrived yesterday. I brought everything I needed to cut the fabrics into four to the office this morning. In under ten minutes...voila! A nice pile of 2.5"x2.5" squares to be basted in the plane! (I must be kidding myself by the way. Someone remind me that I am travelling with a three year old!)
Well, I feel like I have achieved a lot in such a short time. This shows one more time that I work more efficiently under some stress and approaching deadlines!

I am super excited about seeing my family and friends again after two years. They last saw my son-except the regular Skype calls-when he was just one year old. I am so looking forward to their reaction!
I am also looking forward to the delicious Turkish food which I don't cook very often, street bazaars, fabrics shops, streets at nights full of people, and basically everything! We will be catching up with my hubby in Germany and spending a couple of weeks there as well. I have never been to Germany; so, this will be interesting too. As the last stop, we will hop to England to spend a few days with my husband's niece who is about to give birth. In early August, we will be heading home. 
I feel like this will be a fantastic trip which we will always remember. And some other adventures are waiting for me upon my return!

Well friends; thanks for your patience and reading this long post. I will try to keep blogging while overseas. You can always follow my fabric and food (and everything else) adventures on Instagram.

Stay safe, stay well, keep stitching!
Love,
Nurdan 


Monday, 25 May 2015

Scattered colours placemats and Monday Makers!#40

Hiya all!
Can't believe it is the 40th week of Monday Makers! Where is time going?? My son is turning three this Thursday. I love watching him grow into a beautiful boy but I also want to stop the time. Can't I just keep him at this age? Pretty please???...

You might remember that a while ago I started making some placemats to match with my scattered colours table runner. I finished them almost ten days ago but only today I had a chance to take proper pictures.
Here they are:
 I really like how they turned out and compliment the runner.
A photo that showed all three together would have been very nice but I could only keep the muffins away from my son for five minutes!! Only enough to set the scene for the placemats!
What do you think?
Now to Monday Makers!
Last week I asked your advice on using some fat quarters to make a quilt for my son. I took your advice and asked him if he liked the colours and he said "of course mummy!" So I went ahead and cut them and started sewing the other night.
I will try to post some progress shots during the week if I can.
Now it is your turn to share your finishes and starts with us!
1.Your project can be anything you start on that Monday as long as it makes you move and be active and creative: a new quilt, a knitting project, scrap booking, cross-stitching, baking-we don't mind yummy recipes!, a gardening project, painting your house!, tidying up the pantry!...This is your Monday and you are the maker of the day!
2. Grab the button from the side bar or put a link back to me in your Monday post.
3. Click on "add your link" and just fill in the required areas. 
4. Please link to your specific post, not to your homepage: We would like to find your post easily.
5. To link an Instagram photo, click the Instagram icon at the bottom of the link-up screen and use the URL of your IG feed as the link (for example, my URL is http://instagram.com/hugabitquilts) Please hashtag #MondayMakers!
6. Please take time to visit other links and leave a sweet comment: We love comments!
7. Share the photos of your finished Monday projects in your next link up- I am hoping you will come back again!: Who doesn't love a sweet, finished project or a "before-after" photo?

Monday, 27 April 2015

Monday Makers!#36

Welcome to Monday Makers!#36. Time is definitely flying! I want to thank all the linkers to last week's MM. I had 14 linkers and it is the highest number that my link up received. I am so happy that it is growing nicely. 
Last week, I started making placemats to compliment my scattered colours table runner. I finished piecing them and one is ready to be quilted.
I found some more of the yellow I used in my runner. Since I didn't have the other colours, I chose darker shades (Shade, value? Have to learn them properly) of the green and pink. 
I was more relaxed this time when inserting my colours and happier with their placement in terms of randomness. 
One thing to keep in mind when deciding on the placement of your strips if you are making a bigger project like a runner; too much playing might make you confused and you might end up with a design far from what you like right at the beginning. (You also might regret that you haven't taken a photo of your initial design- I did that!) 
Oh, I have to say that Alex, the author of the book Improvising Tradition which this project is originally in, left a sweet comment to my blog post about my runner and shared the link on her Facebook page- she is also following Hug-a-Bit Quilts on Facebook at the moment! Made my day really!!!

Now, it is time to link up. Show me your projects ladies and gentlemen! 
1.Your project can be anything you start on that Monday as long as it makes you move and be active and creative: a new quilt, a knitting project, scrap booking, cross-stitching, baking-we don't mind yummy recipes!, a gardening project, painting your house!, tidying up the pantry!...This is your Monday and you are the maker of the day!
2. Grab the button from the side bar or put a link back to me in your Monday post.
3. Click on "add your link" and just fill in the required areas. 
4. Please link to your specific post, not to your homepage: We would like to find your post easily.
5. To link an Instagram photo, click the Instagram icon at the bottom of the link-up screen and use the URL of your IG feed as the link (for example, my URL is http://instagram.com/hugabitquilts) Please hashtag #MondayMakers!
6. Please take time to visit other links and leave a sweet comment: We love comments!
7. Share the photos of your finished Monday projects in your next link up- I am hoping you will come back again!: Who doesn't love a sweet, finished project or a "before-after" photo?


Till next time,
Nurdan

Sunday, 19 April 2015

Scattered colours table runner

I will shock you with this post because I will actually blog about a finished project- hurray!!

Couple of weeks ago, I started this table runner as a quick and easy project. As usual, it took me a while to finish it but a late finish is still a finish and I am happy about it.
I want to share some details about this project with you.
Some of you might already know and follow Alex of Teaginny Designs. I came up with Alex on Flickr first and immediately I started following her blog too. Alex is creating beautiful quilts and other home decor items made with improvisation technique. There are so many photos of her beautiful and inspiring projects both on Flickr and on her blog. When I was going through her Flickr photos, I saw the picture of her book called Improvising Tradition. It immediately grabbed my attention with its title and cover photo and I didn't hesitate to buy my own copy.
In her book, Alex is teaching you how to combine some traditional patterns with strip piecing, strata piecing and slice and insert techniques and make 18 beautiful, modern projects. For someone like me who feels nervous when it comes to applying improvisation techniques, this books takes the pressure of you by taking you through the projects step by step with great photos and illustrations and explanation.
So, to get started, I chose the scattered colours table runner project.
I fell in love with this table runner when I first saw it on Flickr and since then, had been thinking about making one.
I had some Kona charcoal and lots of 10 inch Kona precuts in beautiful colours. After some playing with the colours, I chose a nice mustard yellow like in the photo, a pink and a neon green. And, made this.
To be honest, I was a little nervous when I was slicing my strips for the coloured inserts. As much as I tried to let it go, I think I (unconsciously) chose to be on the safer side and most of the time centred my inserts. As a result, my inserts look quite organised and grouped rather than scattered LOL.
 I love the neon effect of pink and green and also love how yellow creates the balance between the colours.
For quilting, I chose to do straight stitching because I wanted the quilting to have the least effect on the overall look of the runner. I chose to bind it with the charcoal, as Alex says in her book too, to take the attention to the coloured inserts.
You can find the Jewel Box Coasters projects from her book as a free download at Sew Mama Sew's blog. 
Lastly, you can purchase your own copy through the link below. Please note that I am an Amazon affiliate. If you purchase this book by following the link below, you make a small contribution to my blog.
Thank you!

Monday, 13 April 2015

Monday Makers!#34

Hi everyone!
Hope the last week treated you well. Mine was emotionally full of ups and downs but I am still alive!

Last week I started a table runner; a project which could be finished quickly. Well...I did finish piecing it in two days but had to make time to quilt it. I also said that I was going to put some more photos with more details about it but I just couldn't do it. Mondays and Tuesdays are really the only days I can spend on quilting and taking some photos; whether progress shots or photos of a finished project. Now that the winter is almost here and days are quite short, there isn't any daylight left to take outdoor or even indoor project photos. The sun sets around 17:40 and by the time I pick up the family and come home, it is already dark. Anyways.
I finished quilting it just an hour ago and I am hoping to prepare the binding and -if my son sleeps a little early- sew it tonight. By this way I will have plenty of time to take some photos of it tomorrow. I am quite happy with the outcome but I want to share more about it, again, hopefully tomorrow
For now, I will show you a progress photo I took yesterday. It gives you an idea about what it looks like. After some gardening, thanks to rain, I had a chance to spend an hour to quilt it.
All three colours are very nice but I love the yellow especially.
Now it is your turn to share your finished projects from last week and freshly started ones today!
1.Your project can be anything you start on that Monday as long as it makes you move and be active and creative: a new quilt, a knitting project, scrap booking, cross-stitching, baking-we don't mind yummy recipes!, a gardening project, painting your house!, tidying up the pantry!...This is your Monday and you are the maker of the day!
2. Grab the button from the side bar or put a link back to me in your Monday post.
3. Click on "add your link" and just fill in the required areas. 
4. Please link to your specific post, not to your homepage: We would like to find your post easily.
5. To link an Instagram photo, click the Instagram icon at the bottom of the link-up screen and use the URL of your IG feed as the link (for example, my URL is http://instagram.com/hugabitquilts) Please hashtag #MondayMakers!
6. Please take time to visit other links and leave a sweet comment: We love comments!
7. Share the photos of your finished Monday projects in your next link up- I am hoping you will come back again!: Who doesn't love a sweet, finished project or a "before-after" photo?

Monday, 6 April 2015

Monday Makers!#33

Happy Easter everyone!
Hope you have had a nice and peaceful Easter.
It was so calming and relaxing for me and my family. We haven't gone anywhere; we took the advantage of the cool weather and did lots of gardening, enjoyed lazy breakfasts and movie nights at home.
The bunny in the photo was made by my son at his childcare centre. He painted it, glued the cotton nose and paws and put the black dots into its eyes. How gorgeous is it! He is so proud of his bunny. When we picked him up on Thursday, he ran to us with the bunny in his little hand and said "look mummy, look daddy! I made a pink bunny!" I am so proud of him. It is amazing to see how much he achieves in every ways of his life even though he has only one hand with five fingers. I love him to pieces...

Last week, I put all my energy together and decided to start a new project; something simple and can be finished in a short time.
I have had all these gorgeous colours left over from my Layers of Charm quilt and some Kona charcoal which I bought a while ago. I thought these bright colours looked beautiful on charcoal; so I decided to make a scrappy table runner with improvisation technique.
I cut my strips and some squares and rectangles for the coloured inserts the other night and started putting them together. I will share some photos and more details in the following days. So far, I like the way it looks and am very happy that I am slowly back to quilting. I have forgotten how therapeutic it is for me...

Now to Monday Makers!
This is the do.Good stitches Cherish bee block I made last week. I made two with the same colours.
It is also the first star pattern I have ever made. I am not a fan of stars-don't know why-thought I wouldn't enjoy making it but it was quite fun to make.

Again, I want to thank all the linkers to last week's MM. I love seeing new bloggers and all the beautiful things they make.
So, what have you done during the Easter period? Come and link up your beauties!
1.Your project can be anything you start on that Monday as long as it makes you move and be active and creative: a new quilt, a knitting project, scrap booking, cross-stitching, baking-we don't mind yummy recipes!, a gardening project, painting your house!, tidying up the pantry!...This is your Monday and you are the maker of the day!
2. Grab the button from the side bar or put a link back to me in your Monday post.
3. Click on "add your link" and just fill in the required areas. 
4. Please link to your specific post, not to your homepage: We would like to find your post easily.
5. To link an Instagram photo, click the Instagram icon at the bottom of the link-up screen and use the URL of your IG feed as the link (for example, my URL is http://instagram.com/hugabitquilts) Please hashtag #MondayMakers!
6. Please take time to visit other links and leave a sweet comment: We love comments!
7. Share the photos of your finished Monday projects in your next link up- I am hoping you will come back again!: Who doesn't love a sweet, finished project or a "before-after" photo?


Monday, 9 March 2015

Monday Makers!#29

Hiya all!
How was your week? Mine was (and has been) pretty bad. My son came down with a tummy bug last week and despite all my efforts, we caught the same thing too. My husband lay on one sofa, I lay on the other. My little one was home with us too as he didn't fully recover. Poor thing had to entertain himself and ate whatever I could bear preparing- mostly a slice of vegemite toast.
Days of feeling sick and not being able to eat properly...very exhausting. I had to go to work like that a couple of day as I was preparing for a big meeting. Not fun.

Today is Canberra Day and is public holiday for Canberra. There were a series of events to celebrate it and hot air balloon festival was one of them-which we missed unfortunately. Here are a few photos, thanks to my friend Lydia!
My son would have loved this balloon as he is a real fan of Angry Birds.
How beautiful are they!
Now to Monday Makers!
I couldn't start the tote bag and the messenger bag for my friend's twins but I managed to make the worst case scenario happen: a pin cushion!
It is a tiny pin cushion which is only 2.5 inches by 3.5 inches. My mini scraps worked well for this cute project. I have enough scraps to make at least a hundred pincushions but I think I don't need that many.
Now it is your turn to share your finishes from the last week and and the new projects you are starting today!
1.Your project can be anything you start on that Monday as long as it makes you move and be active and creative: a new quilt, a knitting project, scrap booking, cross-stitching, baking-we don't mind yummy recipes!, a gardening project, painting your house!, tidying up the pantry!...This is your Monday and you are the maker of the day!
2. Grab the button from the side bar or put a link back to me in your Monday post.
3. Click on "add your link" and just fill in the required areas. 
4. Please link to your specific post, not to your homepage: We would like to find your post easily.
5. To link an Instagram photo, click the Instagram icon at the bottom of the link-up screen and use the URL of your IG feed as the link (for example, my URL is http://instagram.com/hugabitquilts) Please hashtag #MondayMakers!
6. Please take time to visit other links and leave a sweet comment: We love comments!
7. Share the photos of your finished Monday projects in your next link up- I am hoping you will come back again!: Who doesn't love a sweet, finished project or a "before-after" photo?

Friday, 20 February 2015

Trying mosaic tiling

As some of you might know, I have been (forever) building a Mediterranean garden in my backyard. There is a pond in the garden which we put right in front of the fence between us and our neighbours. The pond has a 1.5m by 1.2m wall for a water feature. We want to mosaic this area with a nice design which suits the Mediterranean theme. Because I haven't tried my hand at mosaic tiling before, I decided to attend a workshop to learn at least the basics before I attempt taking up such a big job.
I found Lynne and Jennie of Benianna Mosaics through a friend. They are located at Bungendore, a lovely little town which is 55km from Canberra. A couple of weekends ago, I attended their two-day workshop.
Both Jennie and Lynne are mosaic artists but each has another profession that they retired from. They love what they do with a true passion and are teaching this art to others.
 The workshop was held at Country Women Organisation, a lovely little cottage in Bungendore.
We were six lovely women who got along very well :)
Mosaic tiling is so much fun but it sure requires a lot of concentration and, in some cases, some very precise cutting. It is not like, ok give me a piece of tile and I smash it and then glue them back on a surface.You cut your tile, then trim into the shape you want, file the sides, place it on your design. Then re-place it and re-place it...until you fit all your pieces nicely. Like quilting really.
We were given two design options: a butterfly and a fish. The instructors had already made the templates from a piece of paper. We traced the design on to our concrete paver. I, of course, played with my fish and made it a little different.
I chose to work with black, red, orange and an orangy yellow for my fish and some blues for the background.
 I love how black defines the tail and the fins.
Working slowly and adding pieces bit by bit, my fish started to look like a real fish.
Isn't he gorgeous?
I have received some compliments from my instructor which boosted my ego! They said that I was really good at using my hands and that they could see the quilter in me with my precision cutting and long thinking and playing over the placements of the pieces LOL
I couldn't finish my fish (nice rhyming) in this workshop. We were given all the material we needed to finish our projects except for the cutting tools. I am yet to buy them and finish this gorgeous fishy to be a feature piece in my garden. 
Here are what the other participants made:
What about you? Have you ever tried mosaics? Would you like to? What is your experience?

Cheers,
Nurdan 

Monday, 16 February 2015

Monday Makers!#26

Hiya all!
How was your weekend? I hope it was a good one.
First of all, I want to thank you all who visited my Layers of Charm blog post and left a comment. It has been a great experience in terms of using only solids, make the quilting a little challenging and finally sharing it with you. I have also enjoyed visiting the other bloggers. It is amazing to see how each person interpreted the pattern differently and came up with a wonderful quilt.  I also want to thank you all who have been linking up with with Monday Makers! I have noticed new names and new blogs in the last couple of weeks which is great. I enjoy visiting your pages and seeing what things you are making/ have made. Once again, thank you very much.

Now to Monday Makers!
You know the triangle scraps I ended up with after making two Layers of Charm quilts. I loved the pillow that Afton of Quilting Mod made for her Layers of Charm quilt so much that I decided to make a matching pillow for the other quilt I made with print fabrics.
I haven't played much with the placement of the colours. It also needs one more round of HSTs. As I didn't use one single colour of solid fabric, I am not sure whether the design will show as good as Afton's. But it will sure be a very happy pillow :)

Have you finished a project last week and starting up a new one? Here is the right place to share it with us!
Your project can be anything you start on that Monday as long as it makes you move and be active and creative: a new quilt, a knitting project, scrap booking, cross-stitching, baking-we don't mind yummy recipes!, a gardening project, painting your house!, tidying up the pantry!...This is your Monday and you are the maker of the day!
2. Grab the button from the side bar- DONE!!- or put a link back to me in your Monday post.
3. Click on "add your link" and just fill in the required areas. 
4. Please link to your specific post, not to your homepage: We would like to find your post easily.
5. To link in Instagram photo, click the Instagram icon at the bottom of the link-up screen and use the URL of your IG feed as the link ( for example, my URL is http://instagram.com/hugabitquilts) Please hashtag #MondayMakers!
6. Please take time to visit other links and leave a sweet comment: We love comments!
7. Share the photos of your finished Monday projects in your next link up- I am hoping you will come back again!: Who doesn't love a sweet, finished project or a "before-after" photo?


Monday, 2 February 2015

Monday Makers! #24

Hi all!
How was your week? Mine was pretty good! I made another baby size quilt top with the same pattern that I used to make the Sweet Darling quilt top. I won't be able to show you the quilt tops yet as these are for the introduction of a new pattern which will be released by the Fat Quarter Shop soon. The pattern is quite simple and fun to make. You can whip up a queen size quilt in a day!
I will buy some backing fabric tomorrow for both and will try to finish them as quickly as possible.
I used only solids for the second quilt.
I love these colours. They look so good together; especially on a quilt top :)
From both projects, I was left with 67 pieces of colourful, 4.5 inch triangles.
I am thinking about ways of using them. I came up with this placement after a ten minute play on the design wall.
I imagined a few lines like this floating on a solid base. There are many other designs you can make with triangles; I just don't know what to do. Would you mind sharing your suggestions with me? It doesn't have to be a quilt.

I also experimented cutting my son's hair yesterday. His hair was so long that I was able to make a decent length pony tail! So, after I gave him a bath, I sat him in front of me with his ipad, aka concomputer LOL, and got on with cutting. I normally trim my own hair so I didn't struggle with cutting his at all. 
Because I loved his hair long, I didn't cut it super short. This was his first ever hair cut and I am happy that I did it. I also kept some of his (baby) hair as memory. I need suggestions as to how to keep it; maybe sew a little pouch and keep the hair inside?

Now to Monday Makers!
Share with me what you did last week and what new projects you are starting today.
1. Your project can be anything you start on that Monday as long as it makes you move and be active and creative: a new quilt, a knitting project, scrap booking, cross-stitching, baking-we don't mind yummy recipes!, a gardening project, painting your house!, tidying up the pantry!...This is your Monday and you are the maker of the day!
2. Grab the button from the side bar- DONE!!- or put a link back to me in your Monday post.
3. Click on "add your link" and just fill in the required areas. 
4. Please link to your specific post, not to your homepage: We would like to find your post easily.
5. Please take time to visit other links and leave a sweet comment: We love comments!
6. Share the photos of your finished Monday projects in your next link up- I am hoping you will come back again!: Who doesn't love a sweet, finished project or a "before-after" photo?


Monday, 26 January 2015

Happy Australia Day and Monday Makers!#23

Happy Australia Day!
It is my first Australia Day after becoming a citizen. No difference to how I feel about this awesome country; I have always loved it very much.
It is public holiday today and hubby is home. The weather is cloudy and cool so I will be hitting outdoors soon to help hubby in the yard. First, my finished project from last week's Monday Makers!; a car organiser.
I take the risk and publish a before photo (after cleaning the floor a little bit!).
As you see, lots of stuff on the floor; we can never find the things when we need them. So, here is what I have made to solve this problem:
I changed the fabrics I have chosen previously. I decided that I needed something which is more sturdy and not as soft as quilting fabric. I bought the lovely apple burlap fabric ages ago and the base fabric was also already available. They both have a nice thickness and durability which I needed for this project.
I was planning to make straps to tie/hang the organiser around the head rest. To be honest, I really didn't want to spend time on making those and decided to make button holes to where the headrest is placed. So, it is now sandwiched in between the top of the seat and the headrest. This also makes the organiser hang neatly.
So, for this project, I measured from top to bottom; from where I wanted the organiser to hang and to finish, and side to side. Folded the base fabric in half for extra thickness and cut it, sewed three sides, turned inside out, stitched closed the open end. Then I measured the hight of one of Kuzey's books and cut my apple fabric with an extra half inch for turning under for neat sides. Sewed it to the base fabric on three sides, leaving the top open to create a pocket. I also sewed some elastic band to the top to make things stay inside, if you know what I mean. Then, I eyeballed the depth of the other two pockets and cut my fabric. Repeated the same steps. I stitched the second pocket in the middle to create two pockets and the did the same for the top pocket to create three separate pockets. I attached elastic band to the bottom to go over and around the seat. This keeps the bottom of the organiser attached to the seat; therefore it is not hanging loose.
And this is how it looks after I stuffed the pockets:
I think I will sew another piece of elastic band in the middle of the organiser to go over and around the seat to prevent the sides to turn inwards with the weight of the things inside the pockets. I took this photo quickly; it doesn't look that great but actually it looks very neat and there is nothing on the floor, which is the most important thing! ( I might update the photo later.)
Now it is your turn to share your projects:
1. Your project can be anything you start on that Monday as long as it makes you move and be active and creative: a new quilt, a knitting project, scrap booking, cross-stitching, baking-we don't mind yummy recipes!, a gardening project, painting your house!, tidying up the pantry!...This is your Monday and you are the maker of the day!
2. Grab the button from the side bar- DONE!!- or put a link back to me in your Monday post.
3. Click on "add your link" and just fill in the required areas. 
4. Please link to your specific post, not to your homepage: We would like to find your post easily.
5. Please take time to visit other links and leave a sweet comment: We love comments!
6. Share the photos of your finished Monday projects in your next link up- I am hoping you will come back again!: Who doesn't love a sweet, finished project or a "before-after" photo?


Monday, 19 January 2015

Monday Makers! #22

Hi there!
I hope you had a good week/end. I was in Sydney yesterday; opened my jewellery stall at the Bondi Markets. It was such a hot hot day! My sister-in-law was with me at the stall. We ended up with a headache at the end of the day but the experience was fun. We also don't spend much time together since I am in Canberra and she is in Sydney; so we really enjoyed being together and gossiping away all day!

To Monday Makers!
The floor of my car is always full of stuff; toy cars, books, colouring pencils, cutlery, a pair of shoes, hats...you name it. I would put a photo of how it looked but that would be terribly embarrassing for me! So, I decided to sew a car organiser for Kuzey which has been in my mind for so long; something with a few pockets to store his things. 
I have had this fun Dr Seuss fabric and a coordinating blue for so long now and I think it is time to use them up. 
I haven't measured the seat yet, so I don't know if I have enough fabrics; but I think it will be fine (this is so me!). 
So, what have you done/made last week? Are you starting a new project today? Share them away!
1. Your project can be anything you start on that Monday as long as it makes you move and be active and creative: a new quilt, a knitting project, scrap booking, cross-stitching, baking-we don't mind yummy recipes!, a gardening project, painting your house!, tidying up the pantry!...This is your Monday and you are the maker of the day!
2. Grab the button from the side bar- DONE!!- or put a link back to me in your Monday post.
3. Click on "add your link" and just fill in the required areas. 
4. Please link to your specific post, not to your homepage: We would like to find your post easily.
5. Please take time to visit other links and leave a sweet comment: We love comments!
6. Share the photos of your finished Monday projects in your next link up- I am hoping you will come back again!: Who doesn't love a sweet, finished project or a "before-after" photo?


Monday, 22 December 2014

Monday Makers! #18 and progress on the table topper

Hi all!
How was your week? How is the Christmas rush going? We have been quite busy with working in our backyard to make some sensible progress during this holiday period. We are going to Sydney on Christmas eve to spend Christmas with my husband's family. No pressies were wrapped up yet tho!!
I haven't made much progress with my table topper; I can only sew ten minutes here and there. I am still hopeful that I will finish it before Christmas!
After receiving comments on which version to choose, I decided to go ahead with the version 2, which was also the most liked version.
I sewed my triangles into the background fabric, placed them on my design wall, patched the empty spaces and did my best to maintain the design-it was a little difficult because the triangles were overlapping and separating them was going to increase the size of the table topper. So I had to really squeeze them in this frame.
This is how it looks and hopefully how it will look like if I don't mess it up when sewing. What do you think?
Even though this is a Christmas inspired table topper, I think I will call it "rise up". Sometimes your circumstances might drag you down but you should always find a reason to rise up.

Now to Monday Makers!
Have any finishes to share with me from last week? Maybe a new project you start today? Here are the linky rules:
1. Your project can be anything you start on that Monday as long as it makes you move and be active and creative: a new quilt, a knitting project, scrap booking, cross-stitching, baking-we don't mind yummy recipes!, a gardening project, painting your house!, tidying up the pantry!...This is your Monday and you are the maker of the day!
2. Grab the button from the side bar- DONE!!- or put a link back to me in your Monday post.
3. Click on "add your link" and just fill in the required areas. 
4. Please link to your specific post, not to your homepage: We would like to find your post easily.
5. Please take time to visit other links and leave a sweet comment: We love comments!
6. Share the photos of your finished Monday projects in your next link up- I am hoping you will come back again!: Who doesn't love a sweet, finished project or a "before-after" photo?